Diferencia entre revisiones de «Diseño e Impresión de Piezas 3D con herramientas Open Source. UC3M-2011»

De WikiRobotics
Saltar a: navegación, buscar
(Ficha del curso)
Línea 5: Línea 5:
  
 
* '''Título''': Diseño e Impresión de Piezas 3D con herramientas Open Source
 
* '''Título''': Diseño e Impresión de Piezas 3D con herramientas Open Source
* '''Duration''':  
+
* '''Duración''': 16h, dividas en 8 sesiones de 2 horas
* '''Dates''':  
+
* '''Créditos ECTS''': 2
* '''Place''':
+
* '''Ámbito''': Dentro de Máster de robótica y Automatización de la Universidad Carlos III de Madrid (UC3M)
* '''Organizers''':  
+
* '''Fechas:''':  10/Nov/2011 - 15/Dic/201
* '''Attendees''':  
+
* '''Lugar''': Escuela Politécnica Superior. Campus de Leganés. UC3M
* '''Instructors''':
+
* '''Director del máster''': Miguel Ángel Salich
 +
* '''Estudiantes matriculados''': 11
 +
* '''Profesores''':
 
** Alberto Valero Gómez
 
** Alberto Valero Gómez
 
** [[Juan Gonzalez:Main|Dr. Juan Gonzalez-Gomez]]
 
** [[Juan Gonzalez:Main|Dr. Juan Gonzalez-Gomez]]

Revisión del 12:19 3 may 2012

(click to enlarge)

Ficha del curso

  • Título: Diseño e Impresión de Piezas 3D con herramientas Open Source
  • Duración: 16h, dividas en 8 sesiones de 2 horas
  • Créditos ECTS: 2
  • Ámbito: Dentro de Máster de robótica y Automatización de la Universidad Carlos III de Madrid (UC3M)
  • Fechas:: 10/Nov/2011 - 15/Dic/201
  • Lugar: Escuela Politécnica Superior. Campus de Leganés. UC3M
  • Director del máster: Miguel Ángel Salich
  • Estudiantes matriculados: 11
  • Profesores:

Programme

Day 1

  • Session 1: Introduction
* About ourselves.
* Introduction to modular robotics(PDF)
* Overview of the training on modular snake robots (As shown below)


  • Session 2: Building the MY1 modules
Assembling the MY1 modules. Mounting the battery pack. Preparing the download cable. Building Unimod A1

Day 2

  • Session 3: Software installation
Installing the SDCC C compiler. Installing and testing the Codeblocks IDE. Installing and testing the Pydownloader tool. Introduction to the Skycube board. More programming examples
  • Session 4: Servo controlling
Introduction to servo controlling. Programming the sevos. Introduction to the sinusoidal generators. Programming oscillations. Experiment 1: "The wave". Experiment 2: "The big wave"

Day 3

First Challenge! Building a 30 modules caterpillar robot
  • Session 5: Locomotion in 1D (I)
Finish the 10 Unimods A1. Minicube-I assembling. Experiments on the locomotion of Minicube-I. Building the Cube3 configuration. Experiments on the locomotion of Cube3
  • Session 6: Locomotion in 1D (II)
Building the Cube6 configuration. Locomotion experiments. Building the Cube12 configuration. Locomotion experiments. Building the Cube30 configuration! Locomotion experiments. Locomotion principles. Introduction to the serpenoid curve

Day 4

Second challenge! Building a 30-module snake!!
  • Session 7: Locomotion in 2D (I)
Building 10 Unimods B1. Building 10 Unidmods 2D-B1. Building 5 Minicube-II type A1. Building 5 Minicube-II type B1. Locomotion gaits. Locomotions experiments. Building a 6 modules pith-yaw configuration. Locomotion experiments
  • Session 8: Locomotion in 2D (II)
Building 3 snake9. Locomotion experiments. Building 1 snake18. Experiments. Building the snake30!. Locomotion experiments.

Day 5

  • Session 9: Pending Experiments
Pending tasks, resolve questions, complete the unfinished experiments
  • Session 10: Conclusions and future work

Robotic Kit

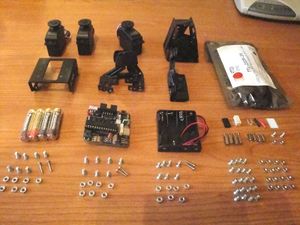
Unit kit (3 modules) (click to enlarge)
  • 3 Futaba 3003 servos
  • Aluminium parts for building 3 MY1 modules
  • 1 Aluminium part for holding the batteries
  • Battery compartment (for 4 AAA standard batteries)
  • 1 Skycube board
  • 4 standard AAA batteries
  • 43 M3 flat head bolts, 8mm.
  • 39 M3 nuts
  • 4 male/female spacers. Size M3, length 12mm
  • 4 spacers (female/female). size M3, length 10mm
  • A two-pin female molex connector
  • Two pins for the molex connector
  • Two pieces of heat shrink tube. Diameter: 2mm. Length: 10mm
  • 3-pin header
  • 1 FTDI TTL-232R-5V Cable
  • 1 small Label

Documentation

Videos

Pictures

Authors

License

CC-BY-SA-logo.png This work is licensed under a Creative Commons Attribution-ShareAlike License.

Links

Acknowledgements

News

  • 02/Mayo/2012: Comenzada esta página